

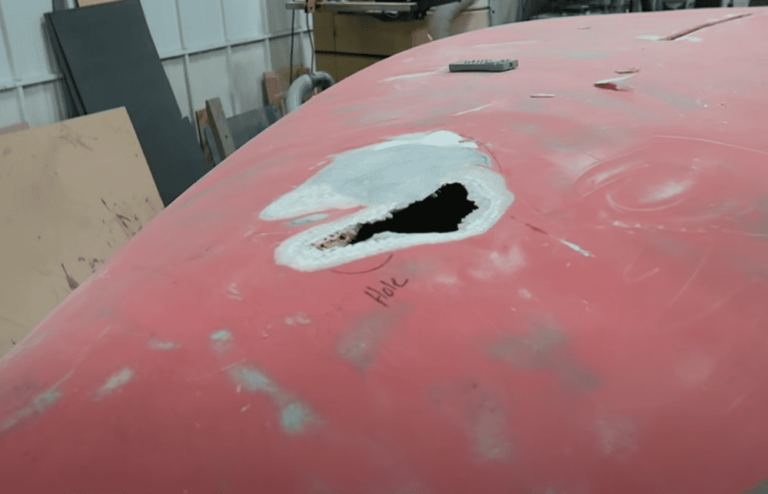

How to Repair Fibreglass Damage on a Small GRP Hull
A step-by-step, practical guide for small-boat owners: from minor gelcoat chips to larger fibreglass repairs. Clear instructions, materials, and safety tips so you can get back on the water.

Overview
GRP (glass-reinforced plastic) is durable, but chips, cracks and small holes happen. Repairs range from cosmetic gelcoat touch-ups to structural glass/laminate fixes. This guide covers common damage types, materials to choose, and a staged repair process so you can match strength and finish correctly.
When to tackle it yourself
- Do it yourself: Small gelcoat chips, surface scratches, hairline cracks, and localized delamination where the laminate is intact.
- Call a pro: Major structural damage (large holes, crushed hull sections, severe delamination across large areas, or keel/engine mounts if load-bearing).
Safety first
Always: Wear a respirator suitable for organic vapours and dust (P2/P3 for dust plus organic cartridge for solvents), nitrile gloves, eye protection and ear protection when grinding. Work in a well-ventilated area and keep dust/swarf away from skin.
Materials & tools
Resins & consumables
- Polyester resin + MEKP catalyst (common, cheap) or epoxy resin (better adhesion and moisture tolerance).
- Chopped strand mat (CSM) and woven roving (for strength where needed).
- Gelcoat (colour-matched) or gelcoat repair paste.
- Fairing compound (polyester or epoxy fairing filler) and finishing putty.
- Sandpaper: 80, 120, 240, 400, 800, 1500 grit.
- Isopropyl alcohol or acetone for cleaning.
Tools
- Grinder with fibre disc or coarse sanding pad.
- Dremel or small router (for precise beveling).
- Brushes for resin, rollers and plastic spreaders.
- Mixing cups, sticks and scale (for accurate resin/catalyst mix).
- Clamps, plastic film, release film or peel‑ply for lamination.
- Heat lamp or infrared heater (optional; speeds cure in cool conditions).
Understand the damage type
Inspect the area carefully. Common situations include:
| Damage | Description | Repair approach |
|---|---|---|
| Gelcoat chip/scratch | Shallow damage limited to the gelcoat surface | Clean, fill with gelcoat or paste, sand & polish |
| Hairline crack | Thin cracks, often only in gelcoat | Open slightly, fill with resin/gelcoat, reinstate finish |
| Through-hole / small puncture | Hole through laminate | Patch from inside with woven mat and resin, fair & finish outside |
| Delamination | Laminate separated from core (if cored hull) or local laminate separation | Assess extent; if small, inject resin or replace laminate; if large, professional repair |
Step-by-step repair: small gelcoat chip or scratch
1 — Clean the area: Wash with fresh water, remove grease, then wipe with acetone or isopropyl alcohol. Let dry.
2 — Sand lightly: Sand around the chip with 240 grit to remove loose edges and feather the gelcoat. For deeper chips, open to sound material but don’t cut away good laminate.
3 — Fill with gelcoat: Use colour-matched gelcoat paste or mix gelcoat with pigment. Apply in thin layers, allowing tack-off between layers per manufacturer instructions until slightly above surface level.
4 — Sand & polish: Start with 240/400 grit to level, then 800/1500 grit wet sanding. Finish with rubbing compound and polish to match surrounding gloss.
Step-by-step repair: small hole or through-laminate patch (structural)
Note: For holes or damaged laminate, you’ll usually patch from the inside where possible to restore full strength.
1 — Expose & prepare: From outside, grind back to solid laminate and bevel the edges to create a square or oval patch area. From inside, clear access and remove any loose material.
2 — Dry-fit glass layers: Cut layers of CSM or woven cloth to progressively larger sizes (e.g., 1 layer 50mm larger than hole, next 100mm larger, etc.).
3 — Layup: Mix resin (polyester or epoxy) with accurate catalyst amounts. Brush a tack coat, then lay the smallest patch first and impregnate with resin using a roller ensuring no dry spots or air pockets. Repeat with larger patches until laminate thickness matches original.
4 — Cure: Allow full cure as per resin instructions. Heat lamps can speed cure but avoid overheating (follow safety and resin temp guidance).
5 — Grind & fair: Trim excess, grind flush, and feather edges. Apply fairing compound to level and sand smooth.
6 — Topcoat: Apply gelcoat or topcoat paint to match. For best results use a colour-matched gelcoat or polyurethane marine paint over a suitable primer.
Tips for a stronger, longer-lasting repair
- Where strength matters, use woven roving or biaxial cloth in the inner layers — these fabrics give better tensile strength than chopped strand mat alone.
- Epoxy resin bonds better to GRP and is less prone to blistering if moisture is present, but it doesn’t always accept polyester gelcoat — you may need an epoxy primer before painting.
- Always follow the resin maker’s mix ratios and working temperatures — undercatalysing causes soft patches, overcatalysing causes excessive exotherm and poor cure.
- Work in shallow layers to avoid excessive heat build-up which can distort surrounding laminate.
Common mistakes to avoid
- Rushing sanding before the laminate is fully cured.
- Using polyester resin over an epoxy-only surface without proper adhesion prep.
- Leaving water or oil contamination — always clean thoroughly before laminating.
- Failing to match laminate directionality on structural repairs (woven/biaxial orientation).
Estimated times & curing guide
These are general timings — always check product data sheets:
- Light gelcoat tack-off: 15–30 minutes (thin layers)
- Polyester laminate initial cure: 30–60 minutes (touch), full cure 24 hours
- Epoxy: longer working time; full mechanical strength often 24–72 hours depending on temperature
When to call a professional
Seek professional repairs if the damage affects structural integrity, near load-bearing fittings (engine mounts, keel), or if you find extensive core rot or widespread delamination. Professionals have ovens, vacuum-bagging and gelcoat matching tools that give superior results.